


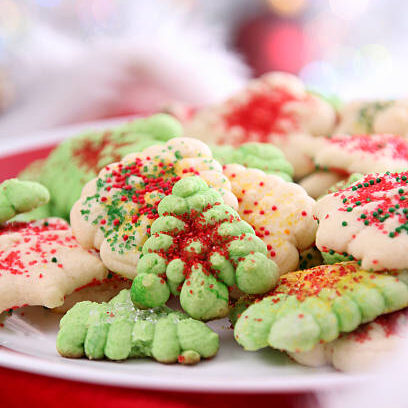
Even if it’s not December, there’s always a good reason to bake something delightful and full of cheer! And when it comes to bringing pure joy to the kitchen, especially with little helpers, few things beat the magic of Christmas Tree Spritz Cookies. These charming, buttery, melt-in-your-mouth treats are a true holiday classic, beloved for their tender texture and intricate shapes.
As a mom, I adore making these with my kids. The cookie press is always a highlight, watching the dough transform into perfect little trees (or stars, or wreaths!) right before their eyes. It’s a wonderful way to foster creativity, practice fine motor skills, and, of course, fill the house with that irresistible aroma of freshly baked goodness.
Spritz cookies are famous for their delicate, crisp texture and their simple yet elegant appeal. The secret lies in a perfect dough and the right technique with your cookie press. We’re going to guide you through making the ideal dough – a rich butter cookie base often flavored with vanilla and a hint of almond extract. We’ll share our secrets for getting that perfect press, ensuring your cookies hold their intricate shapes beautifully. Plus, we’ll show you how to add that extra spark of holiday magic with green food coloring and a shower of colorful sprinkles or sanding sugar before baking.
Whether you’re looking to get a head start on your holiday baking, practice for the festive season, or just want to brighten a regular Tuesday in July with a whimsical treat (because why not?), these Christmas tree spritz cookies are a pure delight. Get ready to fill your cookie jar (and your heart) with these sweet, festive bites!
Our Family’s Classic Christmas Tree Spritz Cookies
These buttery, tender cookies are simple to make and endlessly fun to decorate. They’re perfect for gifting, cookie exchanges, or simply enjoying with a cup of hot cocoa!
- Yields: 6-8 dozen cookies (depending on size)
- Prep time: 20 minutes
- Chill time: 30 minutes (optional, but recommended for stability)
- Bake time: 8-10 minutes per batch
Ingredients:
- 1 cup (2 sticks) unsalted butter, softened
- 1/2 cup granulated sugar
- 1 large egg yolk
- 1 teaspoon vanilla extract
- 1/2 teaspoon almond extract (optional, but lovely!)
- 2 cups all-purpose flour
- 1/4 teaspoon salt
- Green gel food coloring (if making Christmas trees)
- Assorted sprinkles, nonpareils, or sanding sugar for decorating
Equipment:
- Cookie press with desired discs (Christmas tree is perfect!)
- Baking sheets (no need to grease or line)
Instructions:
- Cream Butter & Sugar: In a large bowl, using an electric mixer, cream together the softened butter and granulated sugar until light and fluffy (about 2-3 minutes).
- Add Wet Ingredients: Beat in the egg yolk, vanilla extract, and almond extract (if using) until well combined.
- Combine Dry Ingredients: In a separate medium bowl, whisk together the flour and salt.
- Gradually Add Dry to Wet: Gradually add the dry ingredients to the wet ingredients, mixing on low speed until just combined and a soft dough forms. Do not overmix.
- Color the Dough (Optional): If making green Christmas trees, divide the dough in half. Add a few drops of green gel food coloring to one half and mix until the color is even. Leave the other half plain or color it another festive hue.
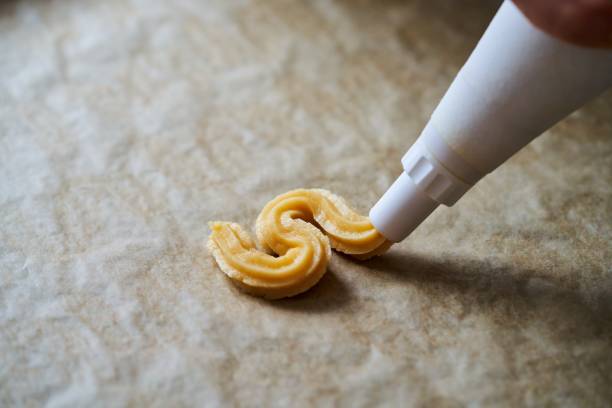
- Load the Cookie Press: Load the dough into your cookie press fitted with the Christmas tree (or other desired) disc. Pack it in firmly to prevent air pockets.
- Press Cookies: Press cookies onto ungreased and unlined baking sheets. Press down firmly, squeezing the trigger until the dough forms the desired shape, then lift straight up. Leave a little space between cookies.
- Decorate: Immediately sprinkle with your favorite festive sprinkles or sanding sugar.
- Bake: Bake for 8-10 minutes, or until the edges are lightly golden. Cookies should be set but still appear pale in the center.
- Cool: Remove from the oven and let cool on the baking sheet for a few minutes before transferring to a wire rack to cool completely.
These classic Christmas Tree Spritz Cookies are not just delicious; they’re a truly fun activity that creates beautiful, edible memories. Which festive shape will you press first? Happy baking!

View comments
+ Leave a comment